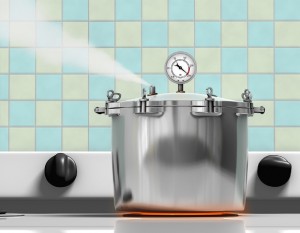
Pressure cooking has been around for several hundred years. It produces flavorful healthy dishes in a hurry, perfect for today’s busy cooks. Fish, chicken, beef, vegetables, beans—they all cook to perfection in minutes!
A pressure cooker works by locking the lid in place and trapping the steam produced by the boiling liquid inside. This raises the temperature much higher than could be achieved under other cooking methods and food will cook quickly and evenly. It is very important to adjust the amount of pressure inside the cooker to prevent explosion.
The old style pressure cooker has a weighted petcock that sits atop the steam valve. It “jiggles” as the food cooks indicating the amount of pressure inside. The faster it “jiggles” the greater the pressure. Once the lid is locked in place the pressure begins to rise. When a full head of steam is being released, the petcock is put in place. The heat source is adjusted to bring the “jiggle” to a steady pace and timing of the food begins.
When the allotted time is reached, the pressure cooker is removed from the heat source and allowed to cool. The petcock is not removed until the pressure drops. There is a small valve built into the lid that will fall when the cooker is cool enough to open.
A newer style pressure cooker is available in today’s market. It operates with a closed system using spring valves and provides more accurate means of determining pressure through marks on the stem valve. The first mark to appear would be the lowest pressure setting and so forth. The standard is that these marks will indicate 10 PSI and 15 PSI. If the cooker has three marks, they probably indicate 5 PSI, 10 PSI, and 15 PSI. Be sure to read the manual that comes with the cooker so it can be operated with accuracy.
15 PSI has always been the pressure cooker standard and recipes usually accept this as the norm. However, some pressure cookers do not conform to this standard and will use a lower PSI setting. In this case, recipes will have to be adjusted accordingly. Again, please be sure to read the manual.
Regular inspection of the cooker is important. It will not pressure if the seal is not tight. Always thoroughly inspect the parts for bits of food that cling to the rim of the pot or the lid. If either has been dropped, check for damages. A lid or pot with a slight dent may not seal.
Also, check the valves to be sure they are clear and tighten any screws. However, the most common problem will be with the gasket inside the lid. It occasionally needs to be removed, washed, oiled and reinserted. This can be a test of patience but gets easier with experience. After many, many uses, the gasket will begin to show signs of wear. Inspect for small cracks and check the feel of it as well. It should not feel “gummy” or brittle. When any of these occur, it’s time to buy a new one.
Remember that there must be some liquid in the pressure cooker before the lid is set in place. Most recipes will use water but any kind of liquid will do. For example, when cooking chicken a can of chicken broth might be preferred. For a cooker with a petcock, the minimum amount of liquid is one cup. The newer cookers can use as little as ½ cup of liquid. These amounts of liquid will allow about 20 minutes of cook time. If the recipe takes longer, add more water accordingly.
The pressure cooker must never be filled more than 2/3’s full of anything, but remember that when cooking food that will produce foam (like dried beans) the cooker should not be filled more than ½ to the top. The cooker will come with a rack that fits in the bottom and is used to hold food off the bottom.
If you brown meat in the cooker, it can be used as is or lifted out to put the rack in place. Be aware that food cooked without the rack can scorch if cooked too long. Also as with any other pan, fit the burner to the pan size. A burner that is too large wastes electricity or gas and one that is too small may not cook the food evenly.
Check the recipe for the particular method used to release pressure before opening. If it requires letting the cooker cool on its own, it means the food needs to continue to cook after being removed from the fire. This is used especially for meat and can take anywhere from 10 to 20 minutes..
A faster method is to remove the cooker from the fire, placing it in the sink and running cold water over the top until the pressure valve drops. Do not run the water over the valve or pressure regulator and do not use this method with an electric pressure cooker.
The third method falls in between the other two in regard to time. Some of the older cookers and all of the newer ones have a valve called quick release. If used, this method will be faster than letting the pressure drop on its own but slower than running it under cold water. Regardless of the method chosen, once the pressure drops, it is safe to open the lid.
The advantages of pressure cooking are many. It saves time by cooking 3 to 10 times faster, depending on the food. Less cooking time means less energy used which reflects on the energy bill. It preserves flavor and vitamins which can be lost in other forms of cooking. It will turn budget meats into tender morsels. It allows “one pot” cooking.
For instance, brown both sides of a pot roast in the bottom of the cooker in a little oil. Add water and seasoning, and pressure according to the size of the roast. Let the pressure drop, open the lid and add vegetables. Reseal and pressure again for 10 or 15 minutes. Once the pressure drops, lift out the meat and vegetables and make the gravy in the same pot!


